Your task is to implement a reliable, stop and wait (lab 1) and sliding window (lab 2) transport layer on top of the user datagram protocol (UDP). You will use IP addresses and UDP port numbers to demultiplex trafic, but not otherwise rely on UDP--in particular you should not rely on UDP's checksum to detect bit errors in packets.
This assignment is split into two labs. In the first lab you just need
to support a single direct connection between two udp ports one on the
server and the other on the client, and you can use the stop and wait
protocol. In lab 2, you extend the functionality to support
demultiplexing of several connections at the server as well as to
support a sliding window with sizes > 1. (Recall that stop and wait
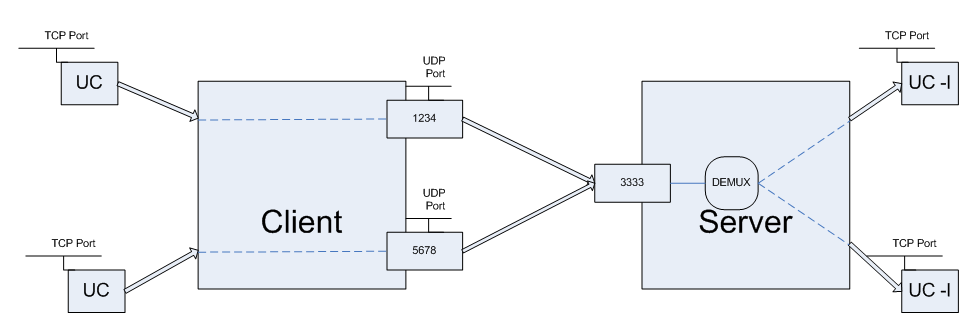
is equivalent to sliding window with a window size of 1). The picture
below shows how the system should look like after Lab 2 is
implemented:
In this assignment, you are provided with a library (rlib.h and rlib.c) and you have to implement some functions and data structures for which skeletons are provided (in reliable.c). In general you will probably find it useful to look through rlib.h, as several useful helper functions have been provided.
In general your implementation should:
You will implement both the client and server component of a transport layer. The client will read a stream of data in (either from STDIN, in the first lab, or from a reliable TCP connection for lab 2), break it into fixed-sized packets suitable for UDP transport, prepend a control header to the data, and write this packet to the server. The server will read these packets, and write the corresponding data, in order, to a reliable stream (STDOUT in lab 1, and a TCP connection in lab 2).
There are two kinds of packets, Data packets and Ack-only packets. You can tell the type of a packet by length. Ack packets are 8 bytes, while Data packets vary from 12 to 512 bytes. The packet format is defined in rlib.h:
        struct packet {
          uint16_t cksum; /* Ack and Data */
          uint16_t len;   /* Ack and Data */
          uint32_t ackno; /* Ack and Data */
          uint32_t seqno; /* Data only */
          char data[500]; /* Data only; Not always 500 bytes, can be less */
        };
        typedef struct packet packet_t;
Every Data packet contains a 32-bit sequence number as well as 0 or more bytes of payload. Both Data and Ack packets contain the following fields. The length, seqno, and ackno fields are always in big-endian order (meaning you will have to use htonl/htons to write those fields and ntohl/ntohs to read them):
The following fields only exist in a data packet:
To conserve packets, a sender should not send more than one unacknowledged Data frame with less than the maximum number of bytes (500), somewhat like TCP's Nagle algorithm.
Your transport layer must support the following:
The output of the server should be identical to the client's input, irrespective of a lossy, congested, or corrupting network layer. You will ensure reliable transport by having the server acknowledge messages received from the client, so that the client may resend dropped or corrupted packets.
Your server should handle multiple client connections
As reliable transport is inherently a stateful protocol, your transport layer should handle simple connection establishment. In this assignment, the server can detect a new connection when it receives a packet with a sequence number of 1.
The seq number of the first packet in a new connection is always 1
You should handle connection teardown (Send EOF).
For Lab 1 you can have the window size to be just one packet. For Lab 2 you have to support larger window sizes. The window size is supplied by the -w command-line option, which will show up as the window field in the config_common data structure passed to the rel_create and rel_demux functions you implement.
Your server and client should ensure that data is written in the correct order, even if the network layer reordered packets. Your receiver should buffer as many packets as the client may send concurrently. In other words, the sender window size (SWS) should equal the receiver window size (RWS), and both should be the same as the window field in the config_common structure.
The sender should resend a packet if the receiver does not acknowledge it within an appropriate time period. You need not implement any backoff like TCP, and can instead merely send packet(s) whenever a sent packet has gone unacknowledged for the timeout period. The timeout period in milliseconds is supplied to you by the timeout field of the config_common structure. The default is 2000 msec, but you may change this with the -t command-line option.
Again, acknowledgements should be cumulative rather than selective. Remember that like TCP, you acknowledge the next sequence number you are expecting to receive, which is 1 more than the largest in-order sequence number you have received. You don't have to handle sequence number overflowing and wrapping in the lifetime of a connection.
You can retry packets infinitely many times, and should make sure you retry at least FIVE times, after which if you want the client can terminate the connection with an error. You can call rel_destroy to destroy the state associated with a connection when you give up on retransmitting.
Note: For debugging printfs you should use the Standard Error fprintf (stderr, ...) and not print on standard output. This is because standard output is being used for the actual program output and it will be confusing for the grader as well as the tester.
There are two modes of operation of the reliable transport protocol:
The first mode is single-connection mode, and connects standard input and output of the two processes together. The second is multi-connection mode, in which a client accepts TCP (or unix-domain) socket connections and relays them over UDP to a server that connects to a TCP port or unix-domain socket.
You are provided with a library (rlib.h/rlib.c) and your task is to implement the following seven functions: rel_create, rel_destroy, rel_recvpkt, rel_demux (Lab 2), rel_read, rel_output, rel_timer:
rel_destroy: A rel_t is deallocated by rel_destroy(). The library will call rel_destroy when it receives an ICMP port unreachable (signifying that the other end of the connection has died). You should also call rel_destroy when all of the following hold:
Note that to be correct, at least one side should also wait around for twice the maximum segment lifetime in case the last ack it sent got lost, the way TCP uses the FIN_WAIT state, but this is not required.
rel_recvpkt and rel_demux: When a packet is received, the library will call either rel_recvpkt or rel_demux. rel_recvpkt is called when running in single-connection or client mode. In that case, the library already knows what rel_t to use for the particular UDP port receiving the packet, and supplies you with the rel_t. In the case of the server, all UDP packets go to the same port, so you must demultiplex the connections in rel_demux.
rel_read: To get the data that you must transmit to the receiver, call conn_input. conn_input reads from standard input when running in single-connection mode, and from a TCP connection when running in client or server mode (thus abstracting away which mode you are in from the protocol implementation). If no data is available, conn_input will return 0. At that point, the library will call rel_read once data is again available again, so that you can once again call conn_input. (Do not loop calling conn_input if it returns -1, simply return and wait for the library to invoke rel_read!)
rel_output: To output data you have received in decoded UDP packets, call conn_output. This function outputs data either to STDOUT or to a TCP connection, depending on the mode of operation. You may find the function conn_bufspace useful--it tells you how much space is available for use by conn_output. If you try to write more than this, conn_output may return that it has accepted fewer bytes than you have asked for. You must flow control the sender by not acknowledging packets if there is no buffer space available for conn_output. The library calls rel_output when output has drained, at which point you can call conn_bufspace to see how much buffer space you have and send out more Acks to get more data from the remote side.
rel_timer: The function rel_timer is called periodically, currently at a rate 1/5 of the retransmission interval. You can use this timer to inspect packets and retransmit packets that have not been acknowledged. Do not retransmit every packet every time the timer is fired! You must keep track of which packets need to be retransmitted when.
To get started on Lab 1, download and untar the assignment package.
Copy reliable.c-dist to reliable.c and fill in the functions there.
You should be able to run the command make to build the reliable program. When you are done with lab 1, two instances of reliable should be able to talk to one another. An example of the working program is given here (with what you type in green).
On machine myth15, run:
myth15:~/test/reliable> ./reliable 6666 myth14:5555
[listening on UDP port 6666]
Hello I am typing this on myth14.
On machine myth14, run:
myth14:~/test/reliable> ./reliable 5555 myth15:6666
[listening on UDP port 5555]
Hello I am typing this on myth14.
Now anything typed on myth14 will show up on myth15 and vice versa.
For debugging purposes, you may find it useful to run ./reliable with the -d command-line option. This option will print all the packets your implementation sends and receives.
For testing purposes, you may wish to test your code against our reference implementation of the source code. The reference is an x86_64 linux binary. If you wish to test on other architectures, you will need to build the reference implementation from source. (You will need a recent version of ghc on your machine, and must use the command ghc --make reference.hs to compile it.)
For lab 2, you will extend your solution to lab 1 to support two additional features:
The first feature is relatively straight forward. When you run the reliable program with the -w argument, it should set the sender and receiver window sizes to be whatever the supplied argument is. For example, the following command should select a window size of 5:
myth15:~/test/reliable> ./reliable -w 5 6666 myth14:5555
[listening on UDP port 6666]
The value specified for the -w argument is stored in the window field of the config_common data structure. You should access it as cc->window in the rel_create function, and store the value somewhere in the reliable_state structure so you have access to it in other functions.
Connection demultiplexing is used when running the reliable program in server mode, which is selected by the -s switch. For example, the following command:runs reliable in server mode:
myth15:~/test/reliable> ./reliable -s -w 5 1111 localhost:2222
[listening on UDP port 1111]
Unlike single-connection mode, which you've been using up until this point, in server mode the argument localhost:2222 specifies a TCP, rather than UDP port. At this point reliable may accept multiple connections from different clients on different client UDP ports, all sending packets to port 1111 on the server. The reliable program will get all of these packets, but since they are all destined to the same UDP port, the rlib code doesn't know which connection they belong to. Therefore, received packets will be passed to the function rel_demux.
In server mode, the library never calls rel_recvpkt. Instead, you must look up the rel_t structure for a packet based on the client's UDP sockaddr_storage. You will find the addreq function that compares two sockaddr_storage structures for equality useful here.
In server mode, reliable input and output no longer come from standard input and output. Instead, for each new connection set up, the library creates a TCP connection to the TCP port specified (localhost:2222 in the example above). There is a utility uc that came with the reliable.tar.gz bundle that allows you to listen to a particular TCP port, so that you can test your library. Just run, e.g., ./uc -l 2222 to listen for one connection on a particular TCP port. (You'll have to run it again in a different terminal if you want to accept more than one connection.)
There is also a client mode, selected by -c. You shouldn't need any special support in your software for client mode, as long as you are using the rel_t structure correctly. Client mode allows you accept TCP connections and relay them to a reliable server on a particular UDP port. For instance:
myth15:~/test/reliable> ./reliable -c -w 5 3333 localhost:4444
[listening on TCP port 3333]
The above command accept connections on TCP port 3333, and for each connection, allocates a new UDP port and uses that port to talk to a reliable server listening on port 4444. The uc command without the -l flag allows you to connect to a TCP port. For instance, to test the above, run ./uc localhost 3333.
To get started you have to log into a machine managed by Stanford ITSS as described on the ITSS webpage .You may login remotely or use one of the computer labs, for example, the myth machines located in Gates B08.We will test your code on the myth cluster, and the instructions given here assume this environment. To log in remotely you can download Putty and use that. Also you can develop remotely using VNC Server/Viewer . To use VNC just download and install VNC viewer. When you have done this run the command "vncserver" on a myth machine for example(maybe connect to it via putty) and then use the new 'X' desktop it returns to connect to the machine via you VNC viewer.
Run the tester giving it your ./reliable program as an argument. By default the tester program will run all tests, not use server mode, and set a window size of one. The following options may be useful to you:
To submit the assignment, you must do two things:
You should direct most questions to the class newsgroup, but not post source code there.
You must write all the code you hand in for the programming assignments, except for code that we give you as part of the assignment and system library code. You are not allowed to show your code to anyone else in the class or look at anyone else's solution. You also must not look at solutions from previous years. You may discuss the assignments with other students, but do not copy each others' code.